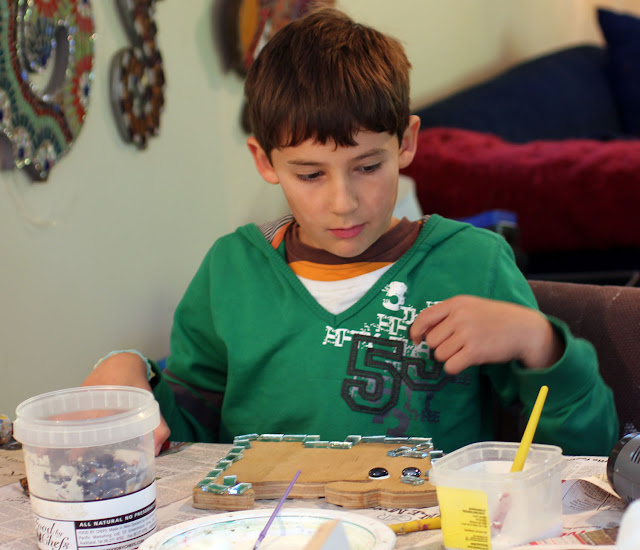
Every school holidays I run mosaic and painting workshops for students. We have a great time making creative creatures.
Here are some tips about becoming a top mosaic maker...
Find a qualified, experienced mosaic teacher in your area or find out if a teacher will travel to you.
Teachers can accelerate your learning and stop you from making ghastly and costly mistakes.
There is a lot more to making an attractive, long lasting mosaic than people realise.
Teachers have valuable techniques to share with you that you won't even read about in books.
Here is a visual taste of what it's like to create you own mosaic.
Step One
Cut out your shape with a jigsaw and prepare it properly.
You can do any shape, butterflies, cats, crosses, hearts, dinosaurs, birds, seahorses and even hippos; the sky and the power of your imagination is the limit.
Certain shapes are better than others and a teacher can advise you on the best things to make and how to cut them out.

Step Two
Use the right type of cutters for the right kind of tiles.
You will need to to cut them correctly so that your hand doesn't end up being too exhausted.
You need to place tiles evenly and neatly using lots of good quality glue.
Step 3.
Step 4.
You need to make decisions quickly; making a mosaic takes lots of time and attention to detail.
Step 5.
Think about line and contrast; these are the most important elements of design that make up a successful mosaic.
Step 6
Take rests; about five minutes every thirty minutes.
Step 7
Step back from your work and admire it, creativity is as much about the enjoyment of the process as the end result.
Step 8
Grout your mosaic.
You have to use the right type of grout for the right situation.
You need to know the right consistency of the grout so it's not too wet and not too dry.
You must take safety precautions while applying grout.
Step 9.
Finishing off is everything.
Make sure you have put the grout into every available gap and you need to find out what special type of fail safe, cleaning solution is best for the job to make your mosaics look like gleaming gems.
Step 9.
Paint the back and sides of your mosaic.
You want the mosaic to last the distance and not fall off after the first burst of rain.
it's time to show your results
Enjoy your mosaics, they are your very own creations and you deserve to be proud of them.
When your mother comes to collect you after having a great time, you will be tired but happy.
Don't be surprised if your friends want to come to mosaic classes as well when they see what you have made.
You too could make a happy Hippo
With a bird on it's back
Parents can come along with you as well and make their own mosaic.
It's all about having fun and being creative in a warm, happy studio setting in an organic cottage garden.
Mosaic making classes for the next school holidays are enrolling now.
Hurry to reserve your places, classes are small.
Janet Keen, ten years mosaic making and teaching experience, Diploma in Visual Arts.
Remember to enrol with a qualified and experienced instructor to make sure your mosaics last.
Book your child or your group/family in for a half or full day workshop where they can make a fish, dog, heart, dinosaur, butterly, hippo , seahorse or any shape you desire.
Creativity Quotes of the day
"No matter how little money and how few possessions, you own, having a dog makes you rich."
-Louis Sabin
Give a man a fish and you feed him for a day; teach a man to fish and you feed him for a lifetime.
Maimonides
There is an eagle in me that wants to soar, and there is a hippopotamus in me that wants to wallow in the mud.
Carl Sandburg
Friend me on facebook
Have a look at my website http://www.jkeen.net/
Ring Janet on 07 346343 or email jkeen@clear.net.nz in plenty of time for the next school holidays.
Here are some tips about becoming a top mosaic maker...
Find a qualified, experienced mosaic teacher in your area or find out if a teacher will travel to you.
Teachers can accelerate your learning and stop you from making ghastly and costly mistakes.
There is a lot more to making an attractive, long lasting mosaic than people realise.
Teachers have valuable techniques to share with you that you won't even read about in books.
Here is a visual taste of what it's like to create you own mosaic.
Step One
Cut out your shape with a jigsaw and prepare it properly.
You can do any shape, butterflies, cats, crosses, hearts, dinosaurs, birds, seahorses and even hippos; the sky and the power of your imagination is the limit.
Certain shapes are better than others and a teacher can advise you on the best things to make and how to cut them out.

Step Two
Use the right type of cutters for the right kind of tiles.
You will need to to cut them correctly so that your hand doesn't end up being too exhausted.
You need to place tiles evenly and neatly using lots of good quality glue.
Step 3.
Tiles have to be placed on the right way up, there are special glues used for mirror which will stop the silver from being corroded.
Step 4.
You need to make decisions quickly; making a mosaic takes lots of time and attention to detail.
Think about line and contrast; these are the most important elements of design that make up a successful mosaic.
Step 6
Take rests; about five minutes every thirty minutes.
Step 7
Step back from your work and admire it, creativity is as much about the enjoyment of the process as the end result.
Step 8
Grout your mosaic.
You have to use the right type of grout for the right situation.
You need to know the right consistency of the grout so it's not too wet and not too dry.
You must take safety precautions while applying grout.
Step 9.
Finishing off is everything.
Make sure you have put the grout into every available gap and you need to find out what special type of fail safe, cleaning solution is best for the job to make your mosaics look like gleaming gems.
Step 9.
Paint the back and sides of your mosaic.
You want the mosaic to last the distance and not fall off after the first burst of rain.
Step 10.
Polish, clean and grout protect your mosaic. it's time to show your results
Enjoy your mosaics, they are your very own creations and you deserve to be proud of them.
Mosaics can look great in the garden or inside.
Pavers and all types of other substrates can be made into mosaics but you have to know which are the best ones and what sorts of glues to use.
Don't be surprised if your friends want to come to mosaic classes as well when they see what you have made.
You too could make a happy Hippo
With a bird on it's back
Parents can come along with you as well and make their own mosaic.
It's all about having fun and being creative in a warm, happy studio setting in an organic cottage garden.
Mosaic making classes for the next school holidays are enrolling now.
Hurry to reserve your places, classes are small.
Janet Keen, ten years mosaic making and teaching experience, Diploma in Visual Arts.
Remember to enrol with a qualified and experienced instructor to make sure your mosaics last.
Book your child or your group/family in for a half or full day workshop where they can make a fish, dog, heart, dinosaur, butterly, hippo , seahorse or any shape you desire.
Creativity Quotes of the day
"No matter how little money and how few possessions, you own, having a dog makes you rich."
-Louis Sabin
Give a man a fish and you feed him for a day; teach a man to fish and you feed him for a lifetime.
Maimonides
There is an eagle in me that wants to soar, and there is a hippopotamus in me that wants to wallow in the mud.
Carl Sandburg
Friend me on facebook
Have a look at my website http://www.jkeen.net/
Ring Janet on 07 346343 or email jkeen@clear.net.nz in plenty of time for the next school holidays.


